By Brad Greer

According to the Federal Emergency Management Agency (FEMA), those over the age of 60 are less likely to take preparedness actions, yet they often tend to be the most at risk.

Here are a few basic things seniors can gather for a beginner emergency preparedness kit so they can be ready for anything:

  1. Non-perishable foods & water

The idea with non-perishable foods, is that they have a very long shelf life, so you don’t have to continue to swap them out every year. A few examples of good choices would be dried or canned fruits and vegetables, shelf-stable cans of meat, jars of peanut butter, small packages of cereal, granola bars, crackers, dry milk, or even specific emergency meal kits where you just need to add water and heat. If you stock up with canned items, make sure you also have a manual can-opener.

For water, you’ll want at least a gallon per person, per day, for at least three days. Water, just like food, is essential, but the body can survive much longer without food than it can water. Be sure water is high on your priority list.

  • Medications

If you’re someone who needs to take medications daily, this is an important reminder to have extra on hand in an emergency preparedness kit. Have enough prescription medications for at least one week. Remember, however, that these medications do expire, so you’ll likely need to swap these out every so often.

  • First aid kit

This is a 100% essential part of any emergency preparedness kit. A first aid kit should include antibiotic ointment, antiseptic wipes, gloves, tweezers, assorted bandage sizes and specifically ones that can help indicate infection, like DrySee which will change color depending on whether or not liquid has broken the barrier. You’ll also want hydrocortisone cream, a thermometer, scissors, and any pain relief medication. You will also need to update items in this every year or so.

  • Source of power

This includes flashlights or headlamps (which will require batteries meaning you’ll also need to pack extra batteries). In addition, you’ll want to pack crank radios and lights, so you don’t rely solely on batteries for power. Portable chargers can help keep your devices charged in an emergency, but the battery will eventually run out and you’ll need to be able to charge these devices with an outlet or other power source. If you have the budget, buying a generator is also a good idea.

When it’s time to finally put your entire emergency preparedness kit together, make sure to store everything in airtight bags, and put everything in one or two easy-to-carry containers that you can access if you’re stuck inside your home, or that can be put into your vehicle quickly if you need to leave.

Brad Greer is chief executive officer of DrySee, a Houston, Texas-based medical technology company that manufactures waterproof bandages that detect if liquid has gotten under them on a wound. 

Late-summer help for flowering perennials

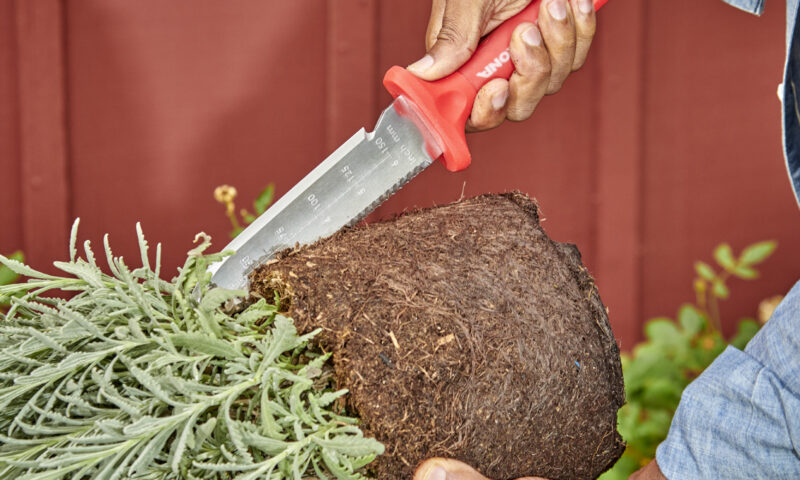
(Pictured: To divide perennial plants into smaller sections, use a sharp spade or garden knife. Photo credit: Corona Tools)

By Melinda Myers

Overcrowded, poor-flowering and floppy perennials can be invigorated with a shovel and a bit of your time and energy. Dividing perennials is an excellent way to improve their appearance and create new plants to use in other spaces in your landscape.

Divide spring flowering perennials in late summer or early fall, divide fall bloomers in spring, and summer blooming perennials in either spring or fall. Some gardeners prefer to enjoy the spring blooms and divide soon after the flowers fade. Most gardeners have found the best time to divide is when they have the time and can provide proper post-transplanting care.

Reduce the stress on plants by dividing perennials on a cloudy, overcast day when the plants won’t dry out so quickly. Make sure they are well-watered a day or two in advance of dividing.

Dig up the whole plant using a garden fork or sharp spade. A shovel with a long handle and narrow blade makes it easier to access plants in small and hard-to-reach spots. Carefully lift the plant out of the soil. Depending on the plant and the tenacity of its roots, you may be able to gently pull the roots apart with your hands. Otherwise, use a sharp spade or knife, or a reciprocating saw to cut the plant into smaller sections. Some gardeners place two garden forks back-to-back in the center of the clump and pull the forks apart to make the divisions.

Discard the dead center, if needed, in the compost pile. Make sure each division has at least three to five healthy shoots and adequate roots. The larger the division, the quicker it will fill in the space and possibly need dividing sooner than smaller divisions.

Replant the divisions as soon as possible. In the meantime, store them in a cool, shaded location and keep the roots covered and moist.

Prepare the soil before planting. You can plant one of the divisions in the original spot once the soil is amended. Use the others to fill in bare areas or start new garden beds. Plant the division at the same depth it was growing. Some gardeners set it slightly higher so it can settle in place. Either way, make sure the roots aren’t exposed and the crown, the part where the roots meet the stems, isn’t buried.
 

Gently firm the soil around the plant and water thoroughly. Check the soil moisture every few days and water deeply and often enough to keep the roots slightly moist. Reduce your watering frequency as the plant begins to develop a more robust root system.

Start by dividing just one or two overgrown plants. As you master the technique, you’ll find it easier to divide perennials when needed to keep your gardens looking their best.

Melinda Myers (melindamyers.com) has written more than 20 books, hosts a video series, and has TV and radio programs on gardening.

These tubs are made for walking-in

According to the National Council on Aging, a quarter of adults over 65 fall each year. Most of these falls occur in bathroom due to slippery floors and stepping up and in or out of a combination bathtub-shower. Ways to help prevent such slips include installing grab bars, non-slip mats, and ventilation systems that reduce surface moisture in the bathroom. Another is the installation of a walk-in bathtub.

The specialized tubs, equipped with a door and seat, allow safer bathing, especially for people of limited mobility or who can’t get up easily in a slippery tub. Their low entries, typically a few inches high, eliminate the considerably higher edge of a traditional bathtub.

Walk-in tubs are also unique because the molded seat enables bathers to enjoy a bath in an upright, seated position while submerged in water, a truly therapeutic soak. Walk-ins have twice the depth of conventional tubs.

The tub doors have rubber seals to prevent leaks. Some manufacturers offer a lifetime warranty on the doors. Other features include drains that empty the water faster to allow bathers to open the door and exit more quickly. Wheelchair and handicap-accessible tub models also are available.

Medicare won’t cover the cost of walk-in tubs, but information on government programs that can for qualified buyers is available from the U.S. Department of Housing and Urban Development.

Depending on the tub’s type and the manufacturer or store, retail prices of walk-in tubs range from $1,500 to $11,000.

Source: Theseniorlist.org, a site with consumer information for older adults.

Too much stuff? Declutter with small steps

(Pictured: Decluttering is easier said than done. But there are ways. Photo credit: Getty Images)

By Christina Clem

Having too much stuff can impede people from relocating or getting healthcare into their homes. We love to think about decluttering and organizing, but we don’t always love to do it.​ Decluttering in real life often feels overwhelming – like there’s no time to go through the mugs, memorabilia, furniture, books, papers and accessories that find a way to pile up in our homes.

To some generations, stuff is important and there is a general assumption that the stuff will be passed down to younger generations. For the older generations, there is a great deal of pride in belongings that have been gathered from hard work and are associated with special memories, but younger generations like Gen X and Millennials don’t feel the same.  And, while it is hard to hear, the more likely situation is your kids and grandkids don’t want your stuff.

However, a few small steps can help jump-start the effort and make it feel more manageable. And the result may even improve your mental health just as much as your home.

  • Plan ahead. Your home is filled with kitchenware, linens, photos and tools that took a lifetime to accumulate. It’s going to take time to go through them and decide what to keep. Decluttering can take several weeks — or longer — and getting a head start will allow you to go through things carefully and decide what to keep and what to toss or donate.
  • Go room by room. Take an organized approach. It might be tempting to declutter a few drawers in the kitchen, a closet in the bedroom and a corner in the garage. But professional organizers suggest finishing a single room before moving on to the next space.
  • Make easy decisions first. Don’t start by going through photographs, collections or mementos. You’ll spend longer going through treasured items, and it’ll be harder to make decisions about things that are linked to memories and strong emotions. Instead, start with the easiest decisions. Getting rid of expired food, old utility bills or stained, ill-fitting clothing will lead to a huge sense of accomplishment and provide the motivation to keep going.
  • Skip the “maybe” pile. It tends to be the biggest pile — and all you’re doing is putting off a hard decision. Instead, separate items into keep, donate, sell, or toss piles.
  • Get your family involved. Before keeping your wedding china or other sentimental items because your family members may want them some day, ask for their input. While they might not want 12-piece place settings or heavy antiques, you might be surprised at the things they would like to keep. Sometimes it might be something you least expected, such as a favorite holiday ornament or a knickknack that reminds them of a family trip.
  • Call in the pros. Decluttering can be hard to go at alone. If it’s too much, hire a professional. They can help you create a timeline, hold you accountable, and help you decide what to keep and what to give away.

The National Association of Senior and Specialty Move Managers at www.nasmm.org can help find a senior move specialist in your area. AARP Washington also has a group of trained volunteers who can lead workshops on decluttering and downsizing (www.aarp.org/WASpeakersHub).

Christina Clem is AARP Washington’s communications manager.